Remember the Quiet Book Overview I did a while back? Well I thought that it might be a good idea to answer some general questions about quiet books before I got into the nitty gritty about the individual pages. So here are some answers to questions you might have. If you still have questions, please feel free to leave your questions in the comments so I can address them too!
What size should I make my quiet book?
This is entirely up to you. I made mine about 8"x8", but you could really go with any size. 8"x11" or even as big as 12"x12". I don't think I would recommend going any bigger though. Even 12"x12" might be too big. You want it to be big enough to make the book functional, but you want it small enough to carry around with you and for your child to play with comfortably. If it's too big for them to handle, it's not going to be very fun.
What material should I use to make my quiet book?
I've seen a lot of people use muslin for the quiet book pages. I chose to use flannel. Why did I choose flannel over muslin? Well mostly because I had no idea what kind of material most people used. I went to the craft store and found something that looked like what I'd seen in other quiet books. I wasn't really familiar with muslin at the time. Would I change the material I used? Nah. The flannel works just fine. I don't know exactly how they compare price wise, so check around and see what you can find. Just be sure to use something sturdy but also flexible.
What other hardware should I use to put the book together?
I used grommets and book rings. Each page has 3 grommets and the book uses 3 large book rings - the kind that spread apart so you can add/remove pages. I started with a smaller size but have since moved up to a bigger size because I added more pages. I liked the idea of book rings because I could easily open them and divvy up the pages amongst other children (when we have more). They also allow for free movement in the book as you're looking through the pages. But you could also use ribbon to tie the pages together.
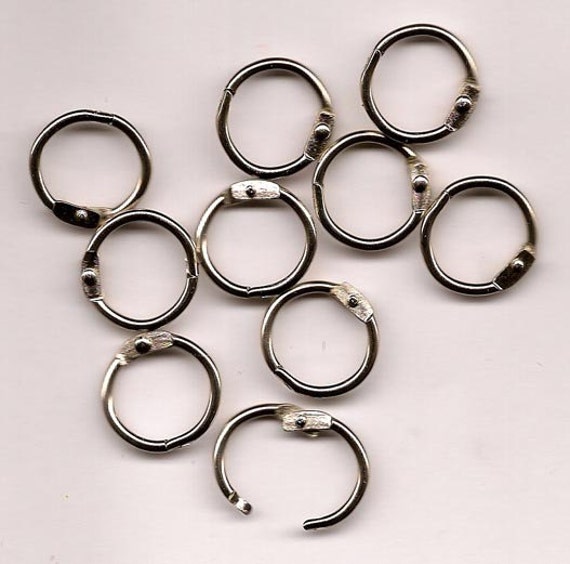
Those are the book rings you should be looking for. See how they have a hinge on one side which allows them to bend apart. There are grooves in the opposite side that keep them from opening when they shouldn't.
I found mine at Walmart in the office supply section. I think I've also seen them at Joanns and Hobby Lobby. I've never seen them at Michaels though.
Grommets are a little intimidating, but easy once you figure them out. For my book, I sewed two pages together with wrong sides together. Each set of two pages takes 3 grommets. You could probably get away with 2 on each page and then you would only need 2 book rings. Your choice.
How should I put the book together?
For most of my pages, I cut out a piece of flannel about 9"x9" (to allow for seams). I then sewed what needed to be permanent on each page. Any removable parts can be added later. After I had 2 pages completed, I put the pages right sides together and sewed around 3 sides of the square. I left one side open and turn the pages right side out. Turn in a bit of both sides of each page. The raw edges should be tucked in between the pages. Then sew the last side. As you put your page together, be sure to leave some extra room on the side where the grommets will go. You don't want them crowding out the fun stuff on your pages. After the last side is sewn together, add your grommets and put it into your book.
What about the cover?
For my cover, I used a minky fabric. I didn't make any kind of buckle or way to keep it closed.
I suppose I could very well add something on a little later though. You could use any kind of material though - the sturdier the better. Felt, canvas, or any kind of home decor fabric would work just as well.
I hope this helps to answer some of your questions. PLEASE let me know if you have any other questions. I'm more than happy to answer them!
Join us for our Christmas Galore Link Party! Come share your awesome ideas for Christmas decor, party ideas, recipes, activities and anything else!!
While you're here, be sure to enter our giveaway for Shutterfly and Plum District Goodies! The giveaway has been extended to December 2nd and there will be 5 winners!
Monday, July 18, 2011
Quiet Book FAQ
Motherhood Moments - From the Mouth of Babes
Andyroo's favorite thing to say is, "Why?" To everything I say. If you have a preschooler, you know what I mean. I humored him for a while and would come up with (mostly) intelligent answers to his constant whys. After a while, especially when he was asking why he couldn't run into the road or why he had to eat his dinner, I started answering with, "Because I said so!"
Any when he asked why to that answer, I said, "Because I'm the mom!"
But not even that appeased the kid. "Why are you the mom?"
My smart reply? "Because that's how Heavenly Father made it!"
Finally, an answer he couldn't (and didn't) argue with. My mom heard our back and forth one day and got quite the kick out of my reply.
Anyway, I told you all of that to tell you about another conversation I had with Andyroo the other day. He and I were getting ready to leave the house and I was taking longer than he would have liked. Of course when I'm ready to go, he wants to take his time but when I need a few extra minutes he's raring to go.
Andyroo was standing at the door leading up the stairs to go out of the house.
Me: "Andyroo, don't open the door yet. You need to wait for me."
A: "But I want to!"
Me: "I know, but Mommy needs a few extra minutes. Please wait for me."
A (getting louder): "But I said I want to go upstairs!"
Me: "I know. And I told you to wait."
A: "Whyyyyyyy?"
Me: "Because I need a minute. Please wait!" (I was getting a little aggravated at this point)
A: "Don't tell me no, mom! I said yes and I'm Andyroo." ("Don't tell me no" - also something else I tell him)
Me: "Excuse me? I'm the Mom, I said no. Now please wait!"
A: "But I'm the Andyroo and Heavenly Father made it that way too."
You can't argue with that, can ya?
Sunday, July 17, 2011
Bitty Booties Inspiration
Have you seen the Bitty Booties created by Heather Bailey!? Holy cuteness. I saw these made on another blog quite a while ago and saved the pattern for later. I have tons of friends with new babies or about to have babies, so I'm pulling out the pattern and whipping some up.
I went looking for inspiration over at the Bitty Booties Flikr Group. I think I'm even more confused now though, lol!
Now I just have to figure out what I want to do. I'm including them in another new baby gift basket I'm doing later this week. Check back to see what I came up with!
(All photos used were found on the Bitty Booties Flikr Group. Links posted when possible).
I went looking for inspiration over at the Bitty Booties Flikr Group. I think I'm even more confused now though, lol!
| Baby Moderno by Honorita |
| From Kukadas' Photostream - Las Kukadas De Sandra |
| LOVE the simpleness and the lining! From Incy Wincy Stitches Photostream |
| From Sweet Mammy por Fabiola Beppler's Photostream |
| From Gracious May's Photostream |
| Also from Gracious May's Photostream |
| From BumbleBL's Photostream |
| From Il Cassetto Delle Idee's Photostream |
| From emmmylizzzy's Photostream |
| From Mostly Charlie's Photostream |
| Red Boy Booties from sybrowskym's Photostream |
Now I just have to figure out what I want to do. I'm including them in another new baby gift basket I'm doing later this week. Check back to see what I came up with!
(All photos used were found on the Bitty Booties Flikr Group. Links posted when possible).
Labels:
Baby Shower Gift,
Gift Ideas,
Inspiration,
Just for Kids
Family Home Evening Idea - Pioneers
In Utah (and some other locations) we celebrate Pioneer Day on July 24th. Call it state holiday, if you will. Part of what the Primary is talked about in Sharing time this week is Pioneers, along with the temples. Here are some ideas for FHE this week!
Song: Whenever I Think About Pioneers (Children's Songbook #222) (Download the song as an mp3 here or find the words and music here)
Scripture: D&C 136: 1-16 (All about the organization of the pioneers)
Lesson & Activity Ideas:
Song: Whenever I Think About Pioneers (Children's Songbook #222) (Download the song as an mp3 here or find the words and music here)
Scripture: D&C 136: 1-16 (All about the organization of the pioneers)
Lesson & Activity Ideas:
- Do some research to find out if you have any pioneer heritage. Just because your family didn't travel across the plains doesn't mean you don't have any. And if you determine you don't have any type or form of pioneer heritage, make the lesson more about your ancestry or a particular ancestor that you connect with/admire.
- Learn more about the Mormon Pioneers by checking out the Pioneer Story on lds.org. If you don't know of any pioneers in your family line, there are a few pioneer stories you can share with your children.
- Try to show your children what it was like to be a pioneer. Discuss the differences and similarities between then and now. Some ideas: How we get and prepare our food; how we obtain our clothing/bedding/materials compared to making clothing and such; the kinds of foods we eat compared to what they eat; forms of entertainment - no computers, cell phones, electricity, etc; housing; customs and manners.
- Make Marshmallow Covered Wagons (idea from the Friend, July 2007)
- If you don't want to focus on Pioneers, focus on the importance of journals. The only way we know what the pioneers (and any past ancestors) endured is through the journals they wrote.
- If you have time, patience and older children (who can do it on their own or who can help younger kids) then try out this Covenant Wagon activity from LDSFamilyFun.com. They also recommend a great video clip about Brigham Young and the Salt Lake Valley here (provided by LivingScriptures.com on YouTube).
Labels:
Family Home Evening,
Family Time
Saturday, July 16, 2011
Funny for the Moms - Anita Renfroe
Because I know we can all use a good laugh sometimes. Love this lady!
Friday, July 15, 2011
Feature Blog - Rants from Mommyland
Andyroo fell asleep on my lap, so I've got some free time. I *HAVE* to sit here snuggle my little one! Anyway, Hubs was nice enough to bring me the laptop, so I was checking out Facebook. A friend of mine on Facebook suggested an article from Rants from Mommyland. I think this is my new favorite blog! Hilarious! And not just the post from today - everything that I've read has made me laugh out loud. Luckily Hubs is in the other room doing some stuff for work, so I don't have to explain every time I laugh. Today she's writing about Top 10 Reasons 3 is Worse than 2. I'm a little afraid since we're just venturing into the 3s. The twos have been pretty tame so far, so I'm keeping my fingers crossed that 3 doesn't get so bad, but to be honest it's not looking good. Anyway, I just had to share, so go check it out!
Baby Shower Gift Basket - For a Baby Girl!
Earlier this week I showed you how I took a thrift store basket and made a new liner for it. And today I'm going to show you what I did to make it the cutest, most girliest baby shower basket ever!
Sorry for the not so awesome backdrop there. I was literally putting this thing together until the minute I walked out the door. And then it dawned on me that I should take another picture of it all wrapped up and put together. Poor Andyroo. He was all happy and excited to go to Grandma's (while I went to the baby shower) and he had to wait for mom to snap a few more pictures. I didn't have time to set up lighting inside the house, so this is on the stairs going upstairs and out of the house where there is more sunlight.
This awesome gift basket includes:
The diapers were each rolled up individually, then wrapped with a piece of ribbon and stuck together with a glue dot. Those size 2 diapers are tiny compared to the huge ones I was using for Andrew!
Here's a shot of the onesies. I would have preferred to use pink and brown, but I was out of brown Heat Transfer Material.
These were designed and cut using my Silhouette. LOVE that thing!
I didn't get a picture of the flower clips or headbands because I was running late. The flower clips were simple silk flowers with the plastic removed, re-glued, and then hot glued to a small alligator clip. The headbands were a small piece (about 5 or 6 inches) of ribbon sewn to a piece of soft, stretchy elastic (about 4 or so inches). After seeing our neighbor's new baby, I think I made them too big. But hopefully the baby will be able to grow into them.
The new mommy loved the gift basket and everyone was really impressed with the customized onesies! I hope she doesn't mind if I make some more girly stuff and drop it off on her doorstep!
Sorry for the not so awesome backdrop there. I was literally putting this thing together until the minute I walked out the door. And then it dawned on me that I should take another picture of it all wrapped up and put together. Poor Andyroo. He was all happy and excited to go to Grandma's (while I went to the baby shower) and he had to wait for mom to snap a few more pictures. I didn't have time to set up lighting inside the house, so this is on the stairs going upstairs and out of the house where there is more sunlight.
This awesome gift basket includes:
- A soft pack of Pampers wipes
- Rolled up diapers - about 25-30
- 3 Customized onesies
- 3 Flower clips
- 2 Ribbon headbands
- A boxed set of baby toys
The diapers were each rolled up individually, then wrapped with a piece of ribbon and stuck together with a glue dot. Those size 2 diapers are tiny compared to the huge ones I was using for Andrew!
Here's a shot of the onesies. I would have preferred to use pink and brown, but I was out of brown Heat Transfer Material.
These were designed and cut using my Silhouette. LOVE that thing!
I didn't get a picture of the flower clips or headbands because I was running late. The flower clips were simple silk flowers with the plastic removed, re-glued, and then hot glued to a small alligator clip. The headbands were a small piece (about 5 or 6 inches) of ribbon sewn to a piece of soft, stretchy elastic (about 4 or so inches). After seeing our neighbor's new baby, I think I made them too big. But hopefully the baby will be able to grow into them.
The new mommy loved the gift basket and everyone was really impressed with the customized onesies! I hope she doesn't mind if I make some more girly stuff and drop it off on her doorstep!
Labels:
Baby Shower Gift,
Gift Ideas,
Silhouette
Subscribe to:
Posts (Atom)