Join us for our Christmas Galore Link Party! Come share your awesome ideas for Christmas decor, party ideas, recipes, activities and anything else!!

While you're here, be sure to enter our giveaway for Shutterfly and Plum District Goodies! The giveaway has been extended to December 2nd and there will be 5 winners!


Showing posts with label Kid's Room. Show all posts

Tuesday, August 30, 2011

Dollar Store Storage Bins

I'm in the process of redoing Andyroo's room. He never got a "proper" nursery when he was born, so I'm making up for lost time and giving him a new big boy room. Part of the new room is some cleaner, more efficient toy storage.


One of the things that drives me nuts about his room is the toys! I know I'm not the only mom out there who feels that way about their child(ren)'s toys. When he was younger and had fewer toys, I tried the shoe size (6 quart-ish) plastic bins. They worked, but he eventually got too many toys and the lids didn't fit or they were stepped on and broken. For a while, his favorite thing to do was dump out the little toy boxes. I finally gave up the insanity of separating the toys and just got him one big box.

But when he dumps that out because he's looking for his tiny green army men, I go crazy. I may be the mom, but I do NOT like cleaning up after the other people in this house!

I was considering making some canvas bins, but I'm afraid that they'll just get ruined very quickly - ripped or crushed or whatever. I wanted to do something that would be sturdy, so I was considering using cut up cereal boxes or plastic canvas as inserts in the middle of the canvas to make them stronger. But I kept thinking about how they would get destroyed so easily. So I put off making them for a few months.

Then as I was walking around the dollar store, I found the plastic bins in pink and light blue and my mind immediately went to the spray paint for plastics! So I grabbed 8 of them. There were only 10 on the shelf and while I considered taking all 10, I thought that was a little greedy. Instead I took 8. Hehe.

Krylon makes a great Plastics spray paint in quite a few colors. I found mine at Walmart for around $4, I think. It was windy, I got a little spray happy, and then towards the end the can wouldn't stop spraying. So the can only did the 3 I needed. *Phew* Even so, a total cost of less than $2.50 per bin isn't bad at all.

Only 6 would fit on Andyroo's shelf. Of the 8 I bought, 5 were a light blue and 3 were a bright pink. Since I needed 6, I was going to have to use one of the pink. I decided to use 3 light blue and 3 pink and paint the pink ones a darker shade of blue. I had pictures of the pink bins (so you could see just how pink they were), but they've disappeared somewhere into the abyss of my computer. Oh well. Use your imagination :)

The 2 shades of blue ended up matching the his Thomas the Train comforter (which I found on Clearance at Target - total score!) really well, which made me extra happy. I'm kind of pulling colors from his comforter for the rest of his room. Someday I'll get it finished and let you all see!


Much more tidy, don't you think?

Each bin is used for a different set of toy - potato head, cars, train, etc. Now everything has a place! And Andyroo doesn't have to dump out the whole bin when he wants to find Potato Head's moustache.


I think I want to add some picture labels, but I haven't decided yet. So far Andyroo's pretty good about just looking to see what is in each box. And I still usually have to help supervise clean up anyway, so I just grab a bin and tell him to put all his cars in it.

These have been in Andyroo's room for a little over a month now and they're working really well. The paint isn't peeling or being scratched off (another of my worries) and they're just so darn cute!


I'm also thinking of painting or redoing the book shelf. Any suggestions?

What system do you have to keep the toys from taking over your house?

Photobucket


We're linking up with these super awesome parties:


Whatever Goes Wednesday, Idea Sharing Wednseday, What I Made Wednesday, Creative-ly U, Feature Yourself Friday, Just Something I Whipped Up, Frugal Friday, Lovely Little Linkup, Craftastic Monday, Woot Woot Wednesday, Strut Your Stuff, Our House of Joyful Noise, Get You Craft On, Wow Me Wednesday, Weekend Wander, Turquoise Lovin', Pity Party

Saturday, August 6, 2011

Felt Playhouse

Felt playhouses were all the rage in blogland a couple of years ago. Seriously, I saw a ton of playhouse ideas floating around out there. At the time I was in school and was taking a sewing class. We had to come up with our own final project. I thought about doing a diaper bag (Andyroo was about 16 months at the time) but couldn't find a pattern I liked. I wanted the bag to actually be functional, so I didn't want to wing it. It was Christmastime and I was in the mood to really make something. So instead I came up with the crazy idea to make not one, but two felt playhouses. One for Andyroo and one for his cousin that is the same age (we had their family for Christmas). Yes, I know. I should have been put in the crazy house for that. When I told my professor, she okayed the project and then quietly added, "But if you change your mind and still want to do a diaper bag, that's still okay too."

But I did it. I completed two felt playhouses. One was before the semester ended (so that I could turn it in and get it mailed out) and the other was finished December 23rd (only because we were spending Christmas Eve at my mom's).


Yes, I fully lined and decorated the inside too. Can you see the "fish tank" through the door?

I'm almost positive that the inspiration for the side pictured below (the tree and vegetables) came from Homemade by Jill. This was in 2009 though, so I don't really remember exactly where all the inspiration and patterns came from. I don't recall using a lot of patterns, just pictures for inspiration. That's just how I roll.


I'm pretty sure I used patterns for the apples and other vegetables here. If I remember right, she painstakingly sewed on individual leaves for the trees. I love Andyroo, but I was on a deadline here folks.


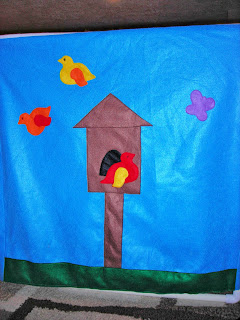
There's a birdhouse complete with birds and butterflies on the side opposite of the tree and garden.


And the back is pretty plain. There's a window and a "doggy door." I wasn't really sure what else to put on there because there wasn't a lot of open space. Don't judge the PVC pipes that you can see through the window. We had the guy at Lowes cut the pipe for us into all even widths, but then when we got home some of the pipe needed to be trimmed. I was taking pictures so that I could send instructions and pictures to my sister- and brother-in-law so they knew what it was supposed to look like.


And the front of the house. The flowers are pickable and plantable. The door rolls up and is held up with a piece of felt and velcro (you can see it if you look carefully).

I didn't get pictures of the inside, but along with the fish tank, there's a cabinet for food, a table, and a clear vinyl slot for a family picture. You can't have a home without a family picture. The inside is lined with a simple buttercup color cotton. I also sewed some pieces of ribbon on the inside of the 4 corners of the house to tie around the PVC pipe just to keep it in place.

Andyroo loved playing in this thing! He loves to hide when he knows someone is coming over (Grandma, daddy coming home, friends coming over, etc) and this was his go-to hiding spot. He also liked to read stories in there. He would pull me inside and bring me arm fulls of books to read to him. Or we would just sit inside and play toys. It was well worth the time, effort, and blood required to make this thing. Yes, blood. I caught my thumb in the needle once while putting all the sides together. Ouch is right.

Luckily I got on A+ on this project.

Like I said, these were huge a couple years ago. Did you attempt your own playhouse? I'd love to hear about it!

Tuesday, July 26, 2011

Thomas the Train - Redone

Remember the Train Canvases I made a while back? Yeah. I've discovered that the Silhouette Vinyl just is not meant to be used on the textured canvas. Not that I added any texture to it, but the regular old canvas is just too textured to get a good stick. The light blue vinyl was the worst. It started peeling off first and then basically it just all fell off. I eventually just took it off and Andyroo only had James and Percy in his room.

So I decided to take another route. Going with something that needed to be removable (because we're renting) and movable (so we can take it with us when we eventually move), I decided I liked the idea of piecing it together in some frames.


MUCH better!!

I still used the vinyl (because I had all the colors and didn't have the color in papers - no black or gold, gasp!), but you could use paper or fabric or anything you want.


Thursday, July 21, 2011

Customized Wipes Container

As part of the Baby Boy Gift Basket that I'm doing, I made a coordinating wipes container to match the basket liner.


I've seen a few customized wipes containers floating around in blog land. I love this idea over at Junk in their Trunk. She painted and modpodged paper onto a wipes container.


I also really liked this Wipes Band idea from Less Cake {more frosting}.


But, I didn't have the really wide elastic and I wanted to make something to coordinate with the basket liner (LINK TO POST) I made to go in the gift basket. I decided I wanted to use the same fabric and dress (or boy) it up a little bit. The main reason for customizing this case though....


Pretty insane, right? I found this wipes container clearance at Walmart for like $0.75. This was before Andyroo decided to potty train, so I grabbed it thinking we would surely use it.

Nope! And now I have this cute (if you like Nemo) but kind of hideous container of wipes that needed to be used. Andyroo tore the plastic off while we were walking through the store and I couldn't stand the thought of these drying out and going to waste. I couldn't just stick them in with a baby gift like this.

Because of the mistake I made with the basket liner, I didn't have a piece of material long enough to go completely around the wipes case, so I had to use two pieces. One went over the back of the wipes case (it was about 9 or 10 inches) and the other went around the front and sides (it was about 17 or 18 inches long). You'll want to measure the wipes container you're working with in order to get an accurate measurement.

I wanted a finished edge, so I hemmed the edge of the material. My wipes container measured about 3 3/4" tall, so I cut my pieces about 4 3/4" and turned up about 1/2 on both the top and the bottom.


For the short piece on the back, I didn't worry about finishing the short sides, but for the long piece, I also turned in about 1/2 inch to give the seam a more finished look. The picture above is of the longer front piece.

After the two pieces were hemmed, I hot glued the back piece onto the wipes case first.


Then I also hot glued the front piece around the rest of the case. I'm all about symmetry, so I found the middle of the front piece and centered it on the wipes case so that they fell evenly on the back of the wipes case. The front piece overlapped the back piece by about an inch on each side.


No more Nemo!

I added a little flair to the wipes case so that it wasn't quite so boring. Nothing much, just a little (manly) ribbon.


We're linking up with these super awesome parties:


Whatever Goes Wednesday, Idea Sharing Wednseday, What I Made Wednesday, Creative-ly U, Feature Yourself Friday, Just Something I Whipped Up, Frugal FridayDIY Under $5, Lovely Little Linkup, Craftastic Monday, Woot Woot Wednesday, Strut Your Stuff, Our House of Joyful Noise, Get You Craft On, Wow Me Wednesday, Lovely Crafty Weekend, Weekend Wrap Up

Thursday, June 30, 2011

*UPDATED* Train Canvases

**UPDATE: I discovered the vinyl doesn't stick to the textured canvas in a long-term capacity. Sad, huh? Anyway, I did some more creating and came up with some Framed Trains. Go check them out!!! And if you know how to get vinyl to stick to the canvas, please let me know!**

As part of Andyroom's train room, I wanted to do something for the walls. However, whatever I put up on the walls needs to be 1) removable, since we have no idea how long we're going to be here (and since we're only renting), and 2) Moveable, as in something we can take with us when we inevitably move. I thought about vinyl on the walls - easily removable, but I would have to redo it in his next room. And who really wants to do that?

I tossed around the idea of vinyl on some kind of frame or board, but ended up with this instead.


Vinyl on canvas! Not exactly a new idea, but I haven't seen anything quite like this.

I scoured the internet for free SVG images of Thomas the Train, or even just trains, but nothing was quite right. After finding Andrew's Thomas the Train comforter on clearance at Target, I knew I had to do something that was definitely Thomas and friends. So I decided to create my own images to cut. It only took about 4 hours total to do all three of them. Once I did the first one, I was able to incorporate some of the basic elements into the others which helped save time.

Putting the vinyl on is pretty self-explanatory. I cut the parts of the train in multiple colors so that the image wasn't so one dimensional, so the hardest part was lining everything up and making sure each train had the correct parts. Because Thomas is the number one engine on Sodor - not Percy (who is number six!). And Andyroo would definitely catch that mistake! Here are a couple pics of the layering process.


I started with the big green piece, or the body of the train, then added everything else to that.


And some closeups of the finished Thomas and James.


The canvases are 11x14 - purchased in a pack of seven at Michaels for about $10 (with a coupon, of course). I used 3 of them for this project, so about $4.50 for all three. Most of the vinyl I already had on hand, but it's about $8.00 a roll, or about $0.30 per foot. I used about $5 worth from the vinyl I already had on hand and had to purchase a couple sheets of extra colors. I'm not counting the price of the whole sheets because they're colors I can (and will) use on other projects. Anyway, the total cost of all the vinyl was probably about $7. So $11.50 for three Thomas the Train wall hangings. Thomas the Train stuff is EXPENSIVE, so I think that's an awesome deal!!

What do you think?


We're linking up with these super awesome parties:


Whatever Goes Wednesday, Idea Sharing Wednseday, What I Made Wednesday, Creative-ly U, Feature Yourself Friday, Just Something I Whipped Up, Frugal Friday, Lovely Little Linkup, Craftastic Monday, Woot Woot Wednesdays, Made it by Monday
Related Posts Plugin for WordPress, Blogger...