Join us for our Christmas Galore Link Party! Come share your awesome ideas for Christmas decor, party ideas, recipes, activities and anything else!!

While you're here, be sure to enter our giveaway for Shutterfly and Plum District Goodies! The giveaway has been extended to December 2nd and there will be 5 winners!


Showing posts with label Halloween. Show all posts

Monday, October 31, 2011

Train Costume Part 2: The Train

Last week I posted about part of Andyroo's costume - the Train Engineer Outfit and the Train Engineer Cap. But no train engineer would be complete without a train to drive.


I asked Andyroo which train he wanted to be. Of course he couldn't be the one that everyone knows - Thomas. He wanted to be James. While we were at the trunk or treat, everyone kept asking him, "Are you Thomas?" He corrected a few people and then must have gotten tired of that because he just started saying, "Yeah," when someone asked.

The train is simply two boxes, some paint, some glue, and whatever you want to use for the straps. The big box was about 11-12" wide, about 12-13" tall, and around 20" long. I added a smaller box on the top that was about the same width and about 3-4" tall. I stuck the boxes together with some hot glue. Add some black, red, gray, and gold paint and you have James!

Here's a close up of the face. I'm no artist (seriously, I'm good at stick figures and that's about it) but I really channeled my past art classes and was able to make James' face. I painted it while Andyroo was napping and when he woke up, I showed him the face and he got a big smile and said, "Mom! James is perfect!"


And a close up of the side.


The wheels are additional circles that I traced, cut, painted and then stuck on with glue dots (because my hot glue gun stopped working).

The train was actually a pretty easy project. It only took about 2 nap times to finish.


So cute!!!

Photobucket

Friday, October 28, 2011

Train Engineer Cap

Sorry it's been so quiet around here this week. I've been busy finishing up Andyroo's Halloween Costume! Yay! Hopefully I'll have the train part of Andyroo's costume finished and posted tomorrow.

As part of Andyroo's Train Engineer costume, he needed a hat! I've never seen them in a store anywhere, so I just decided to make one. I searched around online and found an awesome Train Engineer Cap Pattern over at Aesthetic Nest.. Here's what I came up with!


I made it with the same blue material I used for his Train Engineer Costume. I also purchased some lining as a remnant and some heavy weight interfacing (with a coupon, of course).

I did a couple things different than she did in her pattern. Because Andyroo's head is so big (seriously - that's the large pattern and it has maybe an extra 1/2" of room), I skipped adding the elastic. I also made some stitches at the top of the cap to keep the lining and canvas from separating.


I also didn't add the lining to the brim of the hat and made the interfacing in the brim of the hat 1/2" less all around. I was trying to cut down on the thickness so that I wasn't constantly having to fix my machine. The hat still turned out perfectly!


The pattern and pictures that Aesthetic Nest has posted were such a great help. I was able to whip this up in just a few hours. But it would have taken less time if my machine wasn't always getting jammed (have I mentioned lately how much I need a new machine).

Andyroo loves his hat though, which makes every frustrating stitch and all the jammed needles worth it!

Photobucket

Tuesday, October 25, 2011

Halloween Costume: Train Engineer

We've stuck with a Peanuts theme for Andyroo's costumes for the past couple Halloweens, and though we could have stuck with that same idea and made him Linus or Woodstock, I thought he'd have more fun being a train!

Things are pretty tight financially speaking so I didn't want to shell out $30 for premade costume. Instead I decided to use what I had on hand and make him into a Train Engineer (or conductor, or driver, or whatever the guy who drives the train is called)! I did end up purchasing a few supplies (extra thread and binding) but I made this with a pattern I created using what I already had.


The outfit required a bit more time, mostly because I wanted it to be something Andyroo could use after Halloween. I knew he would absolutely love it wouldn't want to just put it away after trick-or-treating. Right now it looks a little big on him, but it's something that he can continue growing into. Yay!


For the outfit I used the following supplies:

-Light blue Home Decor fabric (like a light weight canvas - I picked it up as remnant about 6 months ago when I was contemplating making my own fabric bins but then found my Dollar Store Storage Bins)
-Dark Blue cotton (leftover from making my Mother-in-Law a KitchenAid cover last Christmas)
-Dark blue binding (because I wanted a little more contrast, you could also just hem all the sides)
-Coordinating thread
-Scissors, pins, measuring tape, etc
-Tissue Paper for making a pattern
-Coordinating ribbon for ties at the shoulder and waist
-Accessories for the costume. Andyroo has a small flashlight, train tickets (not yet finished but I'll be offering the printable soon), toy wrenches, and a walkie talkie/toy phone. You could also do some old keys, a hole punch, etc.

I took all of Andyroo's measurements and got to work. He's about 23 inches around at his widest, so I made the front and back of the costume each about 11 inches wide. His shoulder to knee measurement (remember I want him to grow into this) was about 23", so that's how long I made front and back. I cut out a curve around the neck, left a partial "strap," and then rounded the bottom corners using a bowl. If he's anything like his daddy (which he certainly seems to be so far), he'll be tall and skinny. I have no doubt that this will fit him for years to come.


I also cut some pockets to hold all of his accessories. I put on 3 pockets, but you could do however many you want. I didn't create an actual pattern piece for these. Instead I used my rotary cutter and made 2 squares that were about 3"x3" and another square that was 3"x4". I came up with those measurements after laying the pattern out on my cutting mat and just figuring out what looked proportionate. If you're making this for a different-sized child, you might want different sized pockets.

Before you attach the pockets, you'll want make a small (think 1/8" - 1/4") hem around the sides. I only did 3 sides because I knew I was going to attach binding to the top. Make sure to miter your corners to get a crisp point - not that mine look that crisp though!


I wanted some contrast, so I hemmed the pockets using a dark blue thread. After doing the three sides, I also sewed a strip of binding along the top of the pocket.


I suppose I should have put the binding on first, then turned in the sides, but I didn't. Instead I just tucked the corner of the binding in at the top and sewed it to the apron. Make sure you have your pockets straight. If I had used a real pattern, there would have been marks to transfer to the fabric. Instead I just laid it out my cutting mat and used my big grid ruler to make sure everything was even and straight.

I put the binding on the apron piece before adding the pockets. I did this so I would have a better idea of where the pockets should actually be placed.


The binding really wasn't too hard to work with. I think the hardest part to maneuver was the corners. I'm sure there's a better way to finagle it, but I did something that we'll call a modified or half miter. It worked for me!


To finish the binding, I probably should have turned under the edge of the outer layer of binding, but my machine doesn't like it when I try and shove too many layers through. If it feels that there's too much going through, the needle jams and I have to take the bobbin, bobbin holder, and the spinny thing the bobbin holder sits in out. Then I have to put it all back together and it's a complete pain. At this point, I was working with essentially 9 layers of fabric so I opted to just sew across the raw edge of the binding. If it frays a bit, oh well.

So now I attached the pockets - again using a contrasting dark blue thread. No pics. :)
I thought about adding a little strap to the shoulders with buttons and a button hole. I've never attempted a buttonhole with this machine and when I pulled out my manual, I found that I didn't have the buttonhole foot for the machine. It's a freebie from freecycle, so I can't complain. I attempted it on a scrap piece of fabric and while I probably could have gotten it to work, the in and out of the needle really did a number on the blue canvas and I didn't want to chance the actual costume. So I just decided to do a simple ribbon tie at the shoulders and waist. So much easier than a button - and I get to escape the whole buttonhole thing once more!


At this point, your costume could be done. Put it on your little one and enjoy!

However, I decided it needed something a little more. I had some leftover iron-on inkjet paper leftover from doing the Train page in Andyroo's Quiet Book. I used the images I created for Andyroo's Thomas the Train Wall Decor and a couple other clipart images I found online. Simply print, cut, and iron.


Unfortunately the image didn't adhere very well to the canvas fabric. So the patches look a little...faded. We'll call it vintage-y. Yeah, vintage.


I'm also doing a train for Andyroo to wear. It will be easy - some cardboard boxes and some paint! I'll be posting that later this week so be sure to come back and check it out.

All aboard!!


Photobucket

Friday, October 21, 2011

Party Features - Week 3!

It's time for the 3rd round of party features from our Great Halloween Link Party!! And, can we just say that everything you guys submit is freaking awesome! If you ideas is featured (in this post or in any other), please feel free to grab our featured button from our sidebar! Also, be sure to check out Party Features - Week 1 and Party Features - Week 2!

This Incredibles T-Shirt from Arts & Crafts seems like such a fun and easy idea. And (as she's doing) it's something that you could comfortably wear to work!


I know we've featured Design DNA before in our party features, but holy cow! She has some amazing ideas for Halloween decor - stuff that's cheap and easy! The latest idea that I'm in love with? Man Eating Plants!


And how about this Interactive Monster Wreath from Creating Sarah!? If you pull on the candy in the middle, the eyes and teeth of the monsters pop open. You HAVE to go see how she made it!


We hope you're all enjoying the Great Halloween Link Party as much as we are! If you haven't already, be sure to stop by and link up your Halloween goodness or just get some inspiration!

Photobucket
                           &
Photobucket

Saturday, October 15, 2011

Halloween Extravaganza: Costumes Galore!

Whether you are the host or the guest, go big! When that time of year comes around where it's socially acceptable to be anyone or anything, then by golly you need to be! I thought it would be fun to highlight some costume ideas - ones that are fun, appropriate, and easy. Most of them are DIYable (yup, totally made that word up) but there are some that are for purchase too. If I was all organized, I would have categorized them and stuff, but I'm not. :) So, in no particular order...

If you're pregnant, you could consider going as a bun in the oven and the baker! Check out how they put this together for $10!


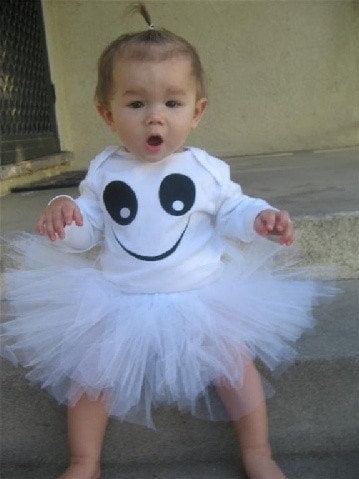
From Sasybrna on Etsy - a cute little Ghost with a detachable onesie! A little tulle, some heat transfer and a onesie and you could have the cutest ghost on the block!


Have some Mario Bros. fans in your midst? Then why not go as Mario and Luigi! Check out how Sustainably Chic Designs put together Mario and Luigi for her son and husband.


Are you a lover of music (or all things Apple)? What a cute idea to be an iPod (or iPad, even)! Check it out over at LilSugar.com. This would be cute for a little one, a grown up, or even the whole family. I'm thinking different Apple products or even the different generations of iPods!


While a Garbage Man/Truck may not be at the top of the list, you could take this idea and do it with any kind of truck or car that your kiddo likes. I found this idea through Gearfuse.com


How about being a bunch of grapes? Or any kind of fruit for that matter! It looks like this is a purple shirt, pants, and a bunch of purple balloons. You could also do green grapes or, for a family, dress up like the Fruit of the Loom characters from the commercials! Sorry, no real source on this one, the link I found was just on Pinterest
.

Do you have a new baby that will be sleeping anyway? Why not swaddle them up and make them into a baby sushi roll! So cute!


Life as a Thrifter made an adorably cute hippie onesie costume. What an easy costume for a little one - and nothing that they're going to hate wearing either!


Have a wiggly baby or toddler? Try out this Spider Web Mom & Spider Baby costume from MarthaStewart.com.


How about being a Publisher's Clearing House winner? What a fun idea! This idea comes from Coolest-Homemade-Costumes.com


One of my favorite games to play when I was younger was Operation - so how about being a doctor and the Operation guy? I'm really in love with this idea!! I found it through Pinterest but the source link wasn't working.


And another from Coolest-homemade-costumes.com - a Pinata!


You can also check out the Halloween Costumes from years past - Mr. & Mrs. Potato Head, Charlie Brown, Frankenstein and the Bride of Frankenstein and a few other fun ideas. There are also links from the Great Halloween Link Up from which you can glean some inspiration.

Photobucket

Tuesday, October 11, 2011

Halloween Extravagaza: Party Invites


The most important part of throwing a great party is sending out a great invitation. I'm sure you've all heard this before. It's true! I've had friends tell me the main reason they started coming to our parties was because of the invitation they received in the mail.

For our Halloween party we always try to choose a good date. I do not recommend the 31st because of trick or treating and other festivities that day. I recommend a week before Halloween or the Friday before. Send your invites out the first of the month. I always made sure to call Miranda about our party date because she would be coming from out of town and her hubby needed to request work off.


For the rest of the wording on the invite you can be as simple as you like or dress it up. I've made up a little poem on past invites. If you're not great at coming up with your own just google Halloween invites and click on images. You will see a load of ideas for little poems to put on your invites. I used the invite above as an example. The more creative your invite the better response you will get as far as guests wanting to come to your party. :)
Some ideas in the past that I've used are melting wax and dripping it over the invitation edges. The above invitation is basically what I did. I've used black and red. We even bought an 'H' stamp to seal our envelopes one year.


Another idea you can bounce off of is sending your guests 'something' in their invite. Last year I bought Martha Stewart invitations and put my own twist on them(yes I'm guilty for not always doing the whole invitation myself). The original came with white shredded paper. I bought moss and just used the fingers and stick on RSVP part of the invite. Miranda had to help me put the bows on the fingers and get the back off the stickers because sometimes I can be craft challenged LOL! Above is the picture of how the invitations were supposed to look. Sadly I don't have a pic of my own with the moss.

You get the idea. Make sure your invite has some flare to it and will be talked about and remembered. Something they'll want to keep on the counter or hang on the fridge to remind them of their upcoming party. Don't forget to make costumes mandatory!!! Have fun with your invites!! :)


Thanks to all the fabulous bloggers out there who take the time and effort to host these spectacular parties!! We're linking up here:


Mondays:
Just Something I Whipped Up, Craftastic Monday, Turquoise Lovin', Making the World Cuter Mondays, Making Mondays Marvelous, Creative Me Mondays, Made By You Mondays, Craft-O-Maniac Monday, Made with Love, More the Merrier


Tuesdays:
Get You Craft On, Tuesday Confessional, Who's Got Glam, Ta-Da Tuesdays, Tip Me Tuesdays, Take a Look Tuesdays, Show Me What You Got, Tuesday Tutorials, Too Cute Tuesdays, Craft & Tell, Tutorials & Tips Tuesday


Wednesdays:
Whatever Goes Wednesday, Idea Sharing Wednesday, What I Made Wednesday, DIY Under $5, Woot Woot Wednesday, Wow Me Wednesday, Your Whims Wednesday, Lil' Luna Link Party, Hoo's Got Talent, We Can Do it Cheaper, Look What I Made, What I Whipped up Wednesday, Wow Me Wednesday


Thursdays:
Strut Your Stuff, DIY Diva Thursdays, Hookin' Up With House of Hepworths, Get Your Brag On


Fridays:
Frugal Friday, Creative-ly U, Feature Yourself Friday, PityParty, Look At Me, Show & Share, Fantabulous Friday, Tickled Pink Fridays, I'm Lovin' It


Saturdays/Sundays:
Lovely Little Linkup, Weekend Wander, Sundae Scoop, Sunday Showcase Party, Think Pink Sundays, Anything Goes, Whatcha Got Weekend, Free For All

Monday, October 10, 2011

More Faves from the Halloween Link Up!!!

It's time for another round of features from our Great Halloween Link Up! If you haven't already, be sure to hop on over and submit your own awesome projects and get some inspiration from the amazing projects that have already been linked up! We'd especially love to see some more costume ideas added to the party!


One of my favorites is the Halloween Spell Book from Design DNA. I love, love, love that it uses common crafting supplies. I know I have everything on hand and might just have to give it a try!


Check out the Cowboy and Indian Princess Costumes that Joy in the Jumble created for less than $10! That's my kind of project! And so cute too!


I've seen all sorts of bat collages around blogland lately, but I love that Lorie from Reading Confetti used handprints to make bats! You have to go see the picture of her son's expression when he first saw the bats. Priceless! And Lorie - I'm in LOVE with your kitchen, by the way!!


If we featured your idea, be sure to grab our featured buttons! Thanks for linking up!

Photobucket

<a href="http://lifeinthemotherhood.blogspot.com"><img src="http://i232.photobucket.com/albums/ee81/mrsdupree819/LITMFeaturedButton2.jpg" border="0" alt="Life in the Motherhood"></a>


Photobucket
Related Posts Plugin for WordPress, Blogger...